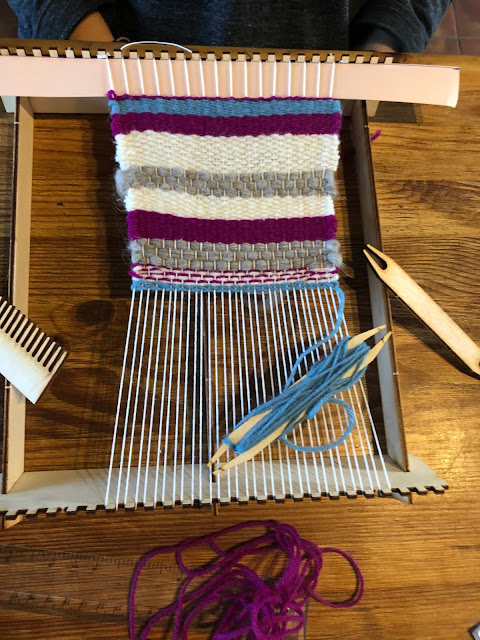
We bought a beginner's pop-up loom and yarn kit from Hawthorn Handmade at The Handmade Fair a little while ago, and we've only now had the chance to have a go! We thought we'd share our experience with you here and we really hope you like it.

So, this is what both of the pieces look like. We were very excited to get stuck in, and although we love making our own colour combinations it was nice to know we could get stuck in with the weaving without having to think too much about which materials to use - so we just got down to business!
We opened the loom pack first (naturally) as this is what the whole thing was going to be created on. The wood snapped apart easily once out of the packet, and the comb and shuttles came attached to everything too.
We then constructed the loom! It does state in the instructions that you will need wood glue (PVA, anything like that) and some sandpaper. Luckily, we had both, and I think many crafty people would. However, if you don't, that is something to keep in mind!
They advise that you build the loom without glue first, to make sure you've got it right, and then take apart and add the glue. You'll need to wait however long your glue takes to dry before actually weaving. The gorilla glue only takes about 5 minutes to go off so that was definitely a plus! Make sure not to add too much glue though, otherwise it will spill out over the edges and possibly mess up your warp.
You're also going to need a ruler and a thin piece of card. The piece of card is to put at the top of your warp (the strings going vertically, we'll get into that soon) so that you can achieve a straight line for your wefts. I feel like this should have been included in the kit but, there you go.
Next, we've got to assemble the warp! This involves basically going up and down with the string as many times as you like, to make as wide a warp as you want. Some people prefer to go all the way along the loom, but it's really a personal preference, and we left a bit of space at either end. It'll be easier to weave if you keep your warp centred (that's what I read anyway, haha 😀.
Okay, now we've got our warp ready to go, we've got to load up our shuttles! You can do it the simple way (how we did it) by just holding one end of the yarn (or whatever you're using) in the middle of the shuttle and then wrapping it over and over either end. But, you can also use the figure-of-eight method, which allows more yarn to be loaded on to the shuttle, without it getting too fat to fit through the warp. I'm no expert in the figure-of-eight method, so if you want to know more about it, then click here to go to someone who knows!
We did a twister header for our weaving, as we read that this will give it a nice neat top. Again, since we're not experts in this field, click here to go to those who are if you want to know how to do a twister header! Basically, you twist the thread over and under and it creates a little twisty plait thingy...see? we're really not experts! Haha 😁.
After our (what we consider to be) fancy header, we then just did a normal 'under, over' weaving method in different colours and materials that came in the kit.
We found some beads that we had in our stash so we wove those into our project too! Just thread the yarn through a needle to easily poke it through the beads. Then just carry on weaving!
Nearly done! Once you get to your desired length, you cut the warp at one end and tie them together and then the other end. You can then sew all the ends into the back and it's lovely and neat!
As you can see, we left two loops at each end so we could hang some driftwood at the top and bottom.
We hope you enjoyed reading and coming along on our weaving journey with us! We had a lot of fun! All links and all that fun stuff are down below!
Keep crafting x
SOCIAL MEDIA AND SHOP LINKS:
Etsy shop
YouTube
Hawthorn Handmade
DISCLAIMER: We are not sponsored nor affiliated with any brands/companies mentioned here. We are providing links for your convenience.


Comments
Post a Comment